So here it is my final render, yay hope you enjoy it.
Sunday, 9 March 2008
Friday, 7 March 2008
Avatar final development idea's
Ok I've rendered a few times but there were a glitches whilst rendering. I already had a basic plan about what my animation would look like through the storyboard that I had previously drawn out.

The screenshot above showed what I intended to create. I did this however I expanded the idea by moving the pencil around the desk more. Rather then rendering my animation in one bit I decided to animate in two parts, one would be the film of the environment and the second part will be the avatar itself.
Below was the first render of the first part of the animation:
I was pleased with what I produced however I had a few problems. First I felt the camera was too jumpy and made the animation look a bit unprofessional. The problem that viewer's agreed with was that it was too quick and I think this also made the cameras look more shaky.
After a few more renders I came out with this outcome:
As you can see I have taken the improvements into consideration and made the necessary changes and I am very pleased with the outcome. To do this I had to double the timing and double each keyframe. This kept the same sequence but just made it longer. To make the camera less shaky I inputted a path constraint, this was a line that made for the camera to go along. It change the camera views but I preferred the outcome of the cameras to my camera angles.
Since writing this post I have created some music to go with the animation and have added the second part of the animation. I had problems with the camera angles on the second animation as you can see below:
I know it doesn't look much but I felt that the cameras were moving around too quickly, there needed to be less camera movement. My aim was for the camera to follow the pencils views however this just made it look jittery and nonprofessional so I rendered the animation again but this time with less camera movement and I am happy with the outcome.
I have nearly finished the animation so I will upload the finished animation soon.
My Environment
After creating my final avatar I had to start designing my environment. I had a strong idea on what I wanted for my final environment because I sat at it everyday, my desk.
I thought that using my desk would be the best way to reflect my avatar and what I am.

The image on the left was what I was trying to achieve for my environment. However I actually wanted to incorporate the room that I live in now and my room back home (see this in screen shots below).

The image on the right shows the first basic look of my environment. After creating my avatar I found creating the basic shapes i.e the desk top, laptop face and base quite simple. I wanted to add some more detail to the walls and after viewing a few other designs I liked the idea of adding a window.

As you can see in the screen shot this is the basic layout of my environment. I started adding maps to my pieces of work to give it a more realistic look. When I first started using 3D Max I did not understand how maps work but now, I find it very easy to incorporate maps.
Another piece that I found difficult was creating the paper falling off the side. I had to use the vertex tool to drop all the vetex points down to how I like, to create the sense of the paper dropping over the side of the desk.

When I had finally finished creating my environment that included adding maps to the floors and some more imagery on the walls it was time to start animating my sequence. I have to thank Troy and Steve for helping me with this. I did not have a clue what I had to do and they both took time out of their work to help me so thanks. They advised me to use the a free form camera because rather then setting the camera on a cetain point I was able to move the camera freely around the environment.
I decided to do my animation in two parts, the first part the movement around the room and the second part is the avatar animation. I had done a few render's for the environment sequence. They would either come out too fast or a bit jittery so by my next post I hope to have sorted this problem out and, possibly finished my computer animation.
Thursday, 6 March 2008
Second life - Diary
In this visit to the second life I only had a short visit because surprise surprise once again the program crashed and when I got on there it was too slow so due to time I could not stay on as long as I wanted.
In my last post I wanted to go and explore other Islands that avatar’s have designed. From a previous post I explained how someone told me to just type in a word to view an island that related to the search word. I thought that it would be interesting to actually find an island that relates to the real world, so what better place then NEW YORK!! But when I teleported it wasn’t what I expected.

I was teleported to the inside of a tram, which I didn’t realise what it was until I got outside of it. As you can see from the image on the left The designer has put much thought and detail in to the design of the artwork. I feel that it really makes a difference and makes it more appealing to other avatars.

I have took screenshots of a few different examples of the strong detail that has been put into this subway. Even the subway map has been designed nearly exactly to how the original would look like. Now that I am off the island I wonder if I stayed on the tram whether it would move from one island to another? Maybe I should go back and see.

I have now finally found my first strong piece of advertisement. When I was researching information the main thing that stood out besides from people using this virtual world to have a ‘second life’ it is also a fast growing way to advertise companies/ products. I have to say, I haven’t really seen much of this in my time on second life, maybe I have but just never noticed them.

The final image on the right is the final image that I took in New York. They were the entrance to the tram stop and they work when you go through them. The reason why this was the final image was because when I actually got to the main street it was empty!! Not like the New York that I remember. The buildings looked old and grubby, there were a few taxi’s that related to the city theme.
So apart from making it to the city and able to see another island I found New York pretty disappointing. I think I’ll stick to the islands that are the popular ones. I think that the islands that are popular are the type of islands that people want to live in in the real world, hence why they are so popular. I’m not too sure what my next aim will be so until next time.
Wednesday, 5 March 2008
Second life - Diary
I have been having a bit of trouble logging onto second life, it either crashes or is too slow to work on so, its taken me quite a while to send another post. But I finally managed to get on for a bit. Right there has been one place that is particularly popular with avatars. Its called Franks place. Its a jazz bar, it only allows avatars that are human and clothed(so i'm sorry you animal avatars out there) Everyone who is in there are dressed for the occasion should I say (very classy)
I have been in there a few times but I am never really dressed up and so none of the avatars talk to mine. So, I thought that I would try and dress up a bit more.

As you can see in the image on the left I attempted to put something smartish on and I did actually get my first dance but I didn't feel right so I thought I would leave and go in search for another outfit that would make me feel the part. I was even offered a dance but, I am a very busy avatar and need to search this world so we left but at least I made a new friend if I need help.

TaaDahh!!! this is the dress that I managed to find, I liked it and I thought it suited the place and, I was right I got talking to someone within a few minutes of being there. The avatar was living in the USA and explained that certain places made users software slow according to how well designed the island was.

The avatar also helped me with showing how to chat to other avatars. There is an option that is called 'IM received' It enables two people to chat together without other people interrupting, it also means that typing and interacting with other avatars would be a more quicker process.

I ended up back at my favourite place 'freebie beach' where I managed to find an awesome outfit. As you can see in the image to the right I think that it looks like a superhero costume, I may get attention I may not, who knows.
The more times I go on this site the more I realise how vain people are. They only speak to you if your attractive and even blank you if they don't want to talk. However there are also avatars who are there too help.
I wanted to meet new people in order to get more help and information which I have started too but as I coming to the end of my avatar life I'm starting to get my own opinion on what this virtual world is about. In my next visit I will go in search of different places to try and see what else second life has in store and has designed.
Sunday, 2 March 2008
My Avatar
It had taken me quite a few days of solid work but I finally completed my 3D avatar on 3D Max learning a few tricks and functions on 3D Max. I thought that it would be a good idea to show fellow bloggers how I created my avatar that I call 'the pencil'.
I had to first of all start off by creating the main base of the avatar. Andy taught us two ways to create a well designed modal in 3D Max. One way was to create it from a box and extrude the bits that you want out, the second way was to create the modal in separate sections and group them together to form one shape. I chose for the second option as my avatar consisted of multiple shapes including pointy and curves which I thought would be hard to create through one shape.
My aim was to make my pencil avatar have the features of a pencil yet also give out the impression of feminine features. To do this I thought that I best way for this was to give the avatar a more curvy look.
I only want ed the avatar to have curves at the top so in order to do this I used the vertex tool (after converting the shape to an editable poly) to pull out the vertex's at the top of the shape. This achieved what I wanted however it was very time consuming and, I feel that there could have been an easier way to have created this.
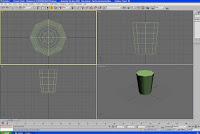
The image on the left shows my final outcome of the first shape. As you can see the image above the top half of the shape has curved out but this was not what I wanted so in order achieve my aim I had too move more vertex's out, in, and down in order to give the shape my outcome. And I am very pleased with the outcome.
Having created the main base of my object I had to start creating the other shapes.

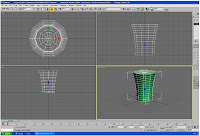
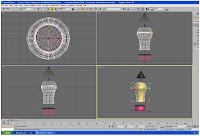
I had to add the metal parts of the pencil and the rubber. I found this an easy task as they were simple cube shapes that I managed to give curves too. The image on the right shows all all the shapes put together and start to form the avatar. I used different colours in order to show the different shapes and where I put them.
Having done all of this my final piece had to be the hardest part. The tip of the pencil I knew would be hard because I had to make align it to the rest of the shape but, had to make sure that the points around the pencil would be showing.
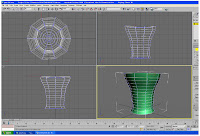
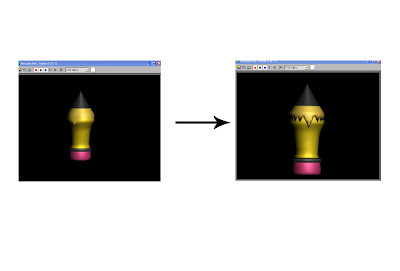
I wanted to show the image of the left to show how I started. By creating a cone I just changed the radius until it was the same size as the original shapes. I used the 'turbosmooth' to smooth the pencil and and, then converted this version into an editable poly so I could work with a smooth and more professional effect.
Below shows the final piece. the image on the bottom left was before I put turbosmooth. When I look at the picture on the left I think personally it looks flat and does not match the rest of the shape. the shape on the right however I really liked and is now my final avatar. After smoothing the image out it matches the shape and gives a more 3D look.
My next aim will be to create the environment and start to animate it. I have created a rough storyboard on what I intend to do however I feel that this may change once I have create the environment.

I had to first of all start off by creating the main base of the avatar. Andy taught us two ways to create a well designed modal in 3D Max. One way was to create it from a box and extrude the bits that you want out, the second way was to create the modal in separate sections and group them together to form one shape. I chose for the second option as my avatar consisted of multiple shapes including pointy and curves which I thought would be hard to create through one shape.
My aim was to make my pencil avatar have the features of a pencil yet also give out the impression of feminine features. To do this I thought that I best way for this was to give the avatar a more curvy look.

I only want ed the avatar to have curves at the top so in order to do this I used the vertex tool (after converting the shape to an editable poly) to pull out the vertex's at the top of the shape. This achieved what I wanted however it was very time consuming and, I feel that there could have been an easier way to have created this.

The image on the left shows my final outcome of the first shape. As you can see the image above the top half of the shape has curved out but this was not what I wanted so in order achieve my aim I had too move more vertex's out, in, and down in order to give the shape my outcome. And I am very pleased with the outcome.
Having created the main base of my object I had to start creating the other shapes.

I had to add the metal parts of the pencil and the rubber. I found this an easy task as they were simple cube shapes that I managed to give curves too. The image on the right shows all all the shapes put together and start to form the avatar. I used different colours in order to show the different shapes and where I put them.
Having done all of this my final piece had to be the hardest part. The tip of the pencil I knew would be hard because I had to make align it to the rest of the shape but, had to make sure that the points around the pencil would be showing.

I wanted to show the image of the left to show how I started. By creating a cone I just changed the radius until it was the same size as the original shapes. I used the 'turbosmooth' to smooth the pencil and and, then converted this version into an editable poly so I could work with a smooth and more professional effect.
Below shows the final piece. the image on the bottom left was before I put turbosmooth. When I look at the picture on the left I think personally it looks flat and does not match the rest of the shape. the shape on the right however I really liked and is now my final avatar. After smoothing the image out it matches the shape and gives a more 3D look.

My next aim will be to create the environment and start to animate it. I have created a rough storyboard on what I intend to do however I feel that this may change once I have create the environment.